Administration
Project management
1. How to create a project
- Log into your Ubertesters account and click the ‘Create New Project’ button.
 Or:
Or: - Choose ‘Create New Project’ from the ‘Create new’ drop-down menu.
 Or:
Or: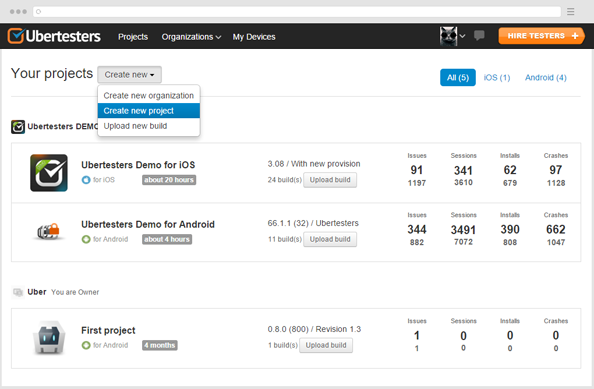
NB: The plans are paid in Ubertesters on an organization basis, one plan include one organization. We recommend you to create the projects under one organization to avoid extra payment.
You will be given two options there:
-
- Select ‘Upload the build to create a project’, then drag and drop the app file if you would to upload the build.
- Once the build is uploaded, specify the project title, then add build title and notes. Click on ‘Confirm build’.
- Select ‘Upload the build to create a project’, then drag and drop the app file if you would to upload the build.
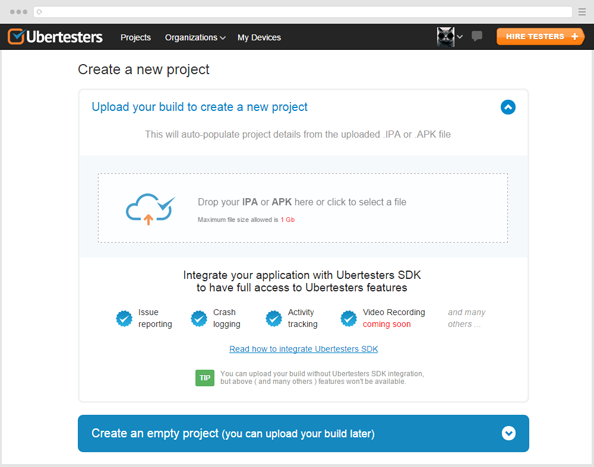

- Select the ‘Create an empty project’ if you would like to upload the build later.
- When the details are added, click on ‘Create project’.

2. How to delete a project
- Navigate to the projects list, click on the project you would like to delete.
- Access Administration section, ‘Delete Project’ tab.
- Read the precaution notes and if you are sure you would like to remove the project, click on the ‘Delete a Project’ button.
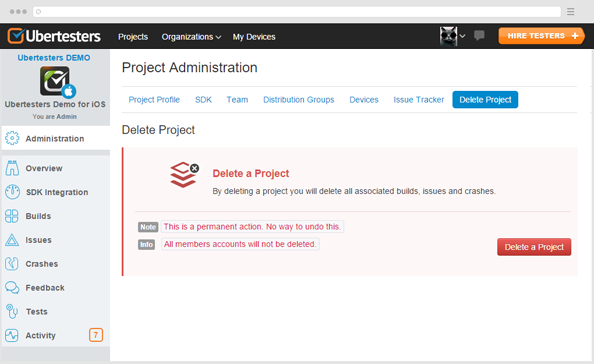
NB: the option is only available for the organization’s owner and admins.
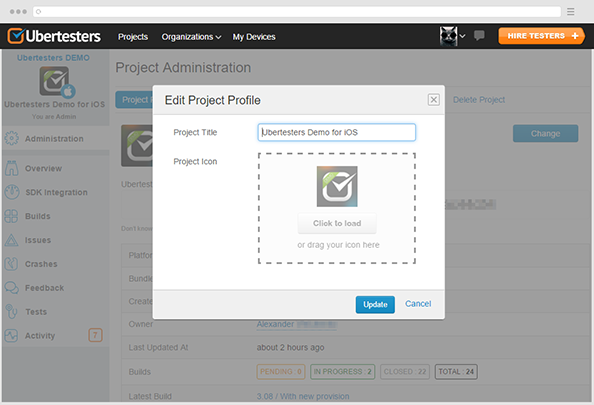
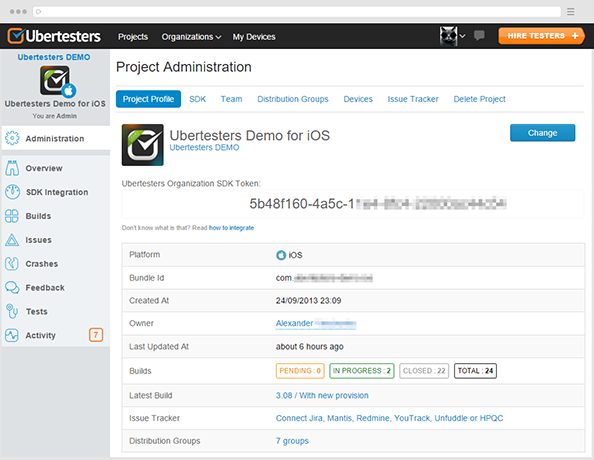
3. How to edit a project profile
- To update Project Profile, click on Project and navigate to Administration tab.
- Click on ‘Change’. The screen where you can upload the project icon and change its title will be shown.
- Click on ‘Update’ to publish the changes.
4. Add members to a project
To start working on a project you need to invite your team. The number of members that can be added depends on your plan.
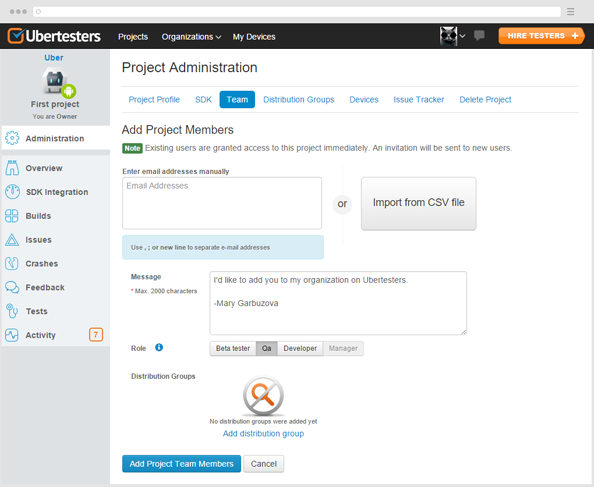
4.1. Add project members from Project settings
- Go to the ‘Projects’ and click on your project.
- Navigate to Administration tab and click ‘Add Members’.
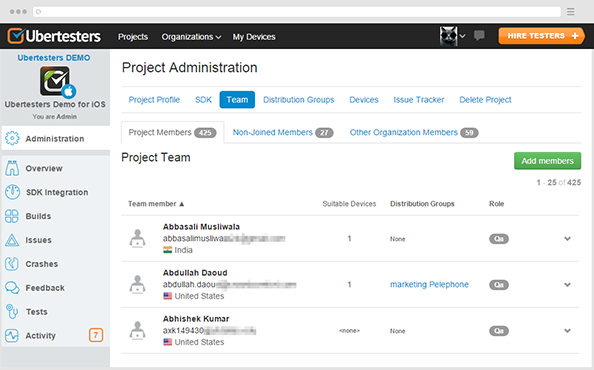
You would be required to add the following details:
- Email address of the new member – you can enter the email address manually or import the contact from CSV file.
- Type the message to the new member that will be sent to him or just leave it empty.
- Grant a role for the new member – it can be QA, Developer or Manager. Each role has different rights.
- Select the distribution group (optional) – it can be one group or multiple ones.
- Click on ‘Add Project Team Members’.
If you would like the organization member to join your project, please do the following:
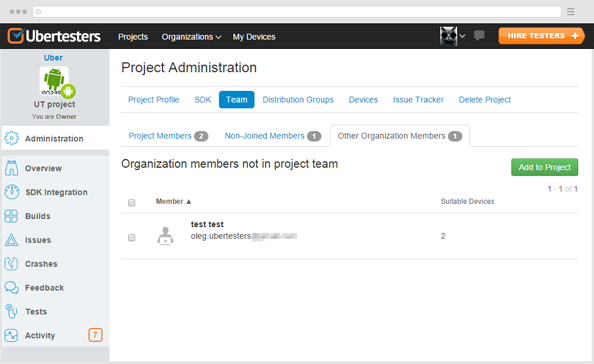
- Navigate to the ‘Administration’ section and access ‘Team’ tab.
- Select the ‘Other organization members’ tab.
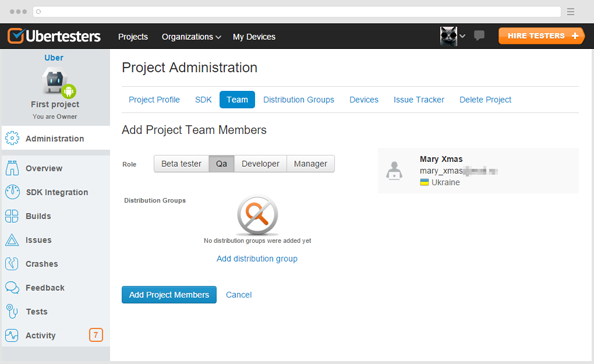
- Mark the selected member and click on ‘Add to Project’.
- Grant this member a role, select a distribution group.
- Click ‘Add Project Members’ button.
Note: ‘Manager’ option is available starting from ‘Start Up’ plan.
4.2. Add organization members to the project
When the member is added to organization, you can manage his role in your projects.
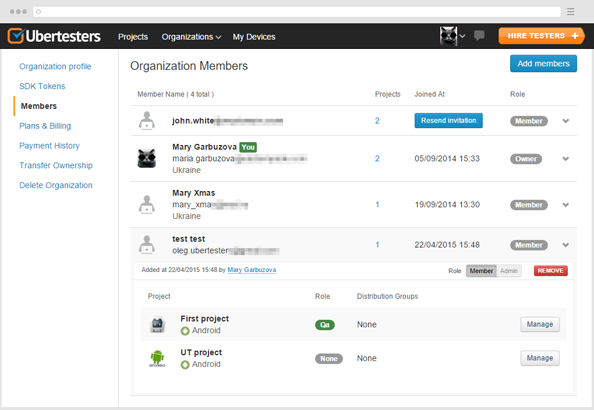
- Navigate to the ‘Administration’ section and access ‘Team’ tab.
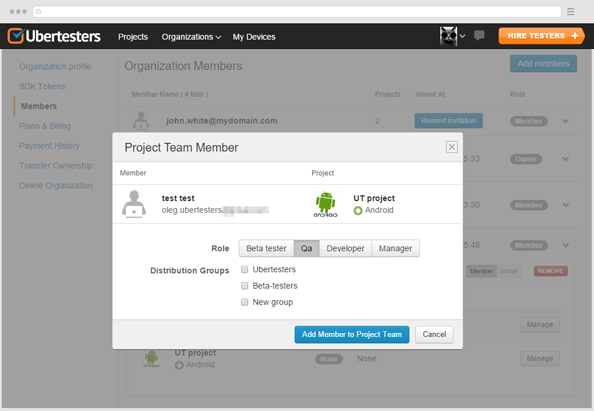
- Click on the selected member and choose an admin or member role for him.
- Click on ‘Manage’ next to required project to grant a member ‘QA’, ‘Developer’, ‘Beta-tester’ or ‘Manager’ role.
- When the role is selected, click ‘Add Member to Project team’.
5. Difference between project member roles
5.1. On the organization level
Owner is the person who created the organization. He has an access to all the Ubertesters functionality.
The owner has the right to:
- Create/remove the projects
- Access payments/invoices and manage billing
- Invite/delete organization members
- Add users to the organization and project as Admins or Members
Admin is an organization member who has the same rights as the account owner. The only exception is that the admin cannot remove an account owner from the account.
Member is an organization user who has no access to billing and do not have right to delete the organization or its members.
5.2. On the project level
On the project level, admins and members can be granted the following roles:
Manager – has the same rights as Admin, but on the project level. He has the right to:
- Upload and start builds;
- Invite users to the project;
- Grant them permission to access the build;
- Access Administration section;
- Watch full activity history;
QA, Developer – do not have access to Administration section. They cannot delete project, start builds, add new members or check the member’s list.
Beta tester – is project member whose access to the project is limited to the reported feedback only. On the mobile device, he can only report feedback.
Usually this role is granted to the external testers, beta testers or other members who should not have access to project details or resources.
6. Manage Notifications
Now it is possible to notify the members of your project about the additions made in the issues. You can select one of the following ways of notifications: watching, non-watching and ignoring.
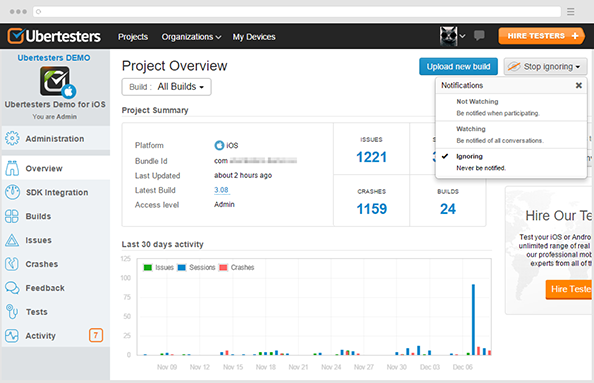
- Watching – in this case you will be notified each time any reported issue is edited or removed. The owner, admins and managers have ‘watching’ status by default.
- Non-watching – you are getting the mail notifications when the issue you’ve reported has been edited or you took part in the discussion over the issue (left a comment). QAs and developers get this status by default.
- Ignoring – in this case, no emails about the editions will be sent.
You can change your notification type set in your account by clicking on the notification icon at the right upper corner of the page. Select one of the provided variants and it will be saved automatically.
Organization management
1. How to create a new organization
An organization is a set of projects on different platforms united by a common business-goal.
- Log into your Ubertesters account and click ‘Create New Organization’ button.
- Fill in the form and click the ‘Create new organization’ button.

NB: The plans are paid in Ubertesters on the organization basis, one plan includes one organization.
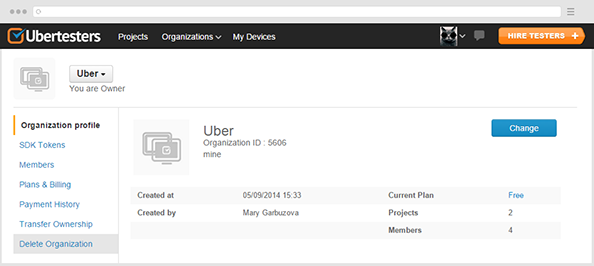
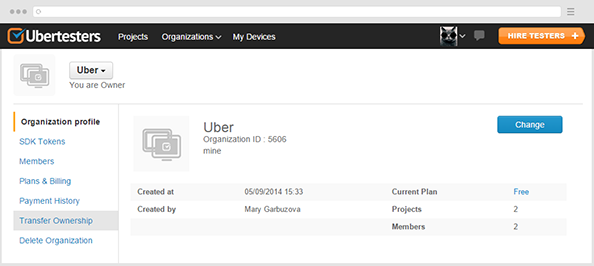
2. How to edit an organization profile
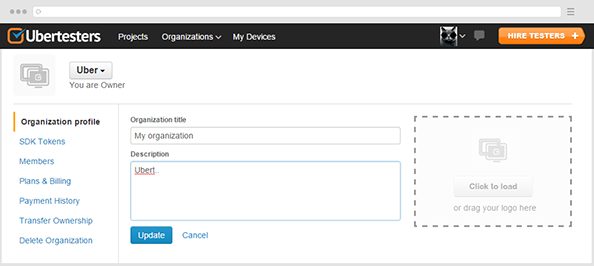
You can add the organization’s logo, title and description in the organization profile. Please do the following to access it:
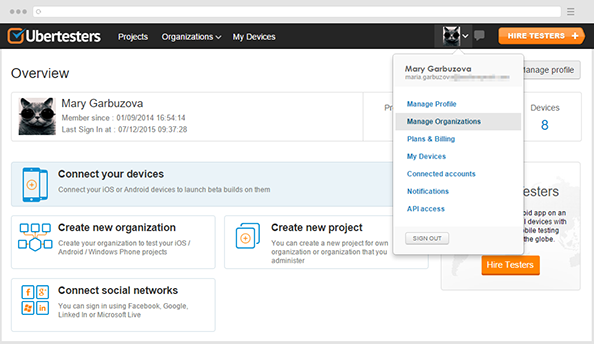
- Click on your Avatar > Manage organizations;
- In the Organization profile, click on ‘Change’;
- Write the organization’s title, add the description and upload the logo. Click ‘Update’.
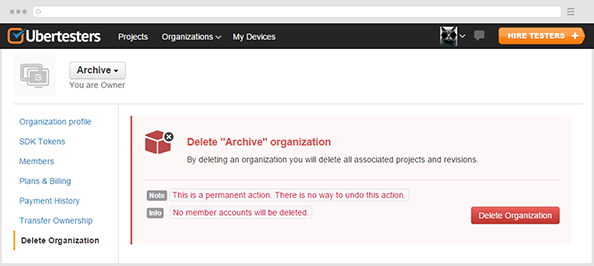
3. How to delete an organization
Note: this option is available for organization owner and admins only.
- Click on your Avatar > Manage organizations;
- Navigate to ‘Delete Ubertesters’;
- Read the warning message and if you are ready to continue, click on ‘Delete Organization’.
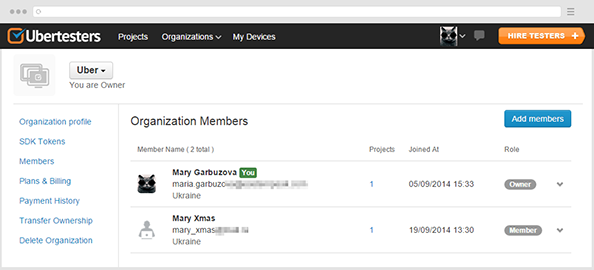
4. Add members to organization
4.1. Add members to your organization
To start working with Ubertesters platform, it is required to add the members to your organization.
- Click on your avatar in the top-right corner and select ‘Manage organization’;
- Navigate to ‘Members’ tab;
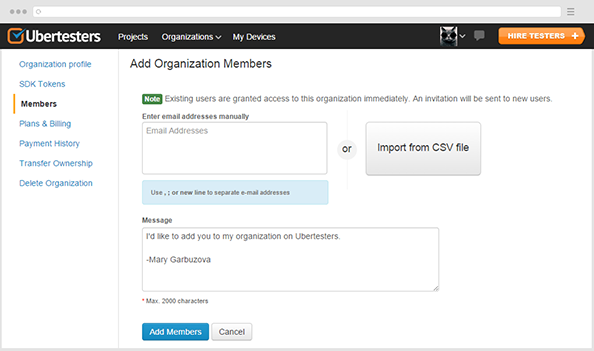
You would be required to add the following details:
- Email address of the new member – you can enter the email address manually or import the contacts from the CSV file.
- Type the message to the new member which will be sent to him or just leave it empty.
- Grant a role for the new member – it can be Admin or Member. Each role has different rights.
- Select the distribution group (optional) – it can be one group or multiple ones.
- Click on ‘Add Members’.
Please note that you would be required to add the organization members to each project separately.
NB: This option is available for organization owner and admin only.
4.2. Add organization members to the project
When the member is added, you can manage his role in organization and your projects.
- Click on the selected member and choose an admin or member role for him.
- Click on ‘Manage’ next to required project in order to grant a member the ‘QA’, ‘Developer’, ‘Beta-tester’ or ‘Manager’ role.
5. Difference between organization members’ roles
5.1. On the organization level
Owner is the person who created the organization. He has an access to all the Ubertesters functionality.
The owner has the right to:
- Create/remove the projects
- Access payments/invoices, manage billing
- Invite/delete organization members
- Add users to the organization and project as Admins or Members
Admin is an organization member who has the same rights as the account owner. The only exception is that the admin cannot remove an account owner from the account.
Member is an organization user who has no access to billing and do not have right to delete the organization or its members.
5.2. On the project level
On the project level both, the admins and members can be granted the following roles:
Project Manager – has the same rights as Admin, but on the project level. He has the right to:
- Upload and start builds;
- Invite users to the project;
- Grant them a permission to access the build;
- Access Administration section;
- Watch full activity history.
QA, Developer – do not have access to Administration section. They cannot delete project, start builds, add new members or check the member’s list.
Beta tester – is project member whose access to the project is limited to the reported feedback only. On the mobile device, he can only report feedback.
Usually this role is granted to the external testers, beta testers or other members who should not have access to project details or resources.
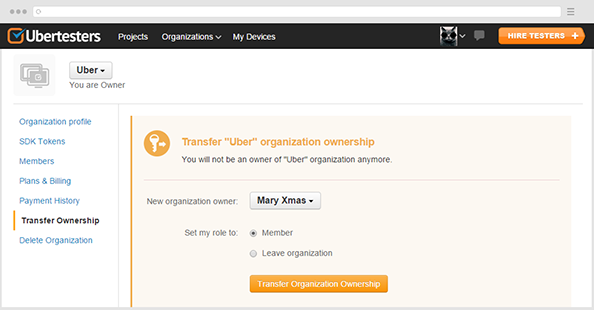
6. Transfer an organization ownership
If you decide to leave an organization or pass the billing management to another person, you can transfer the ownership to one of your organization members.
- Click on your Avatar > Manage organizations
- Select ‘Transfer Ownership’
- Select the member you would like to transfer the ownership to, check whether you would like to stay as an organization member or leave the organization.
- Click on the ‘Transfer Organization Ownership’ button.
Build management
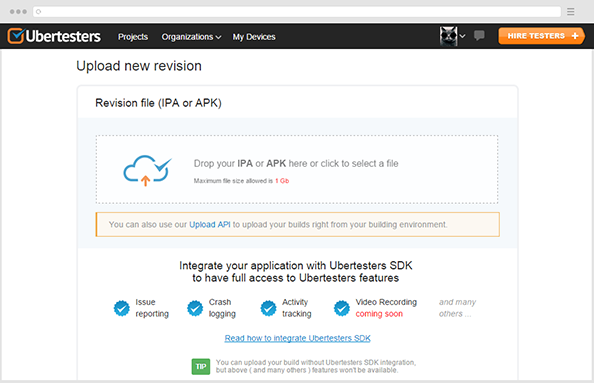
1. Upload a new build
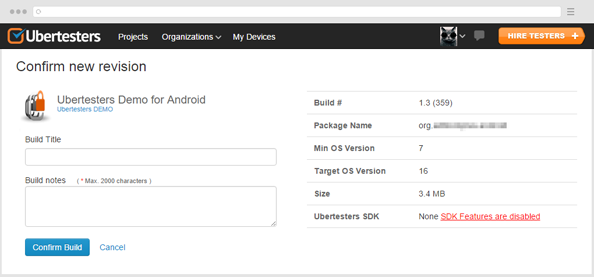
To start the testing process, you are required to upload the build to Ubertesters so it becomes available for the download on mobile devices.
- In project menu, please navigate to the ‘Builds’ tab, then drag and drop the first build.
- Further builds are uploaded by clicking on ‘New Build’ button in Build section.
- When the build is uploaded, fill in build title and notes and click on ‘Confirm Build’.
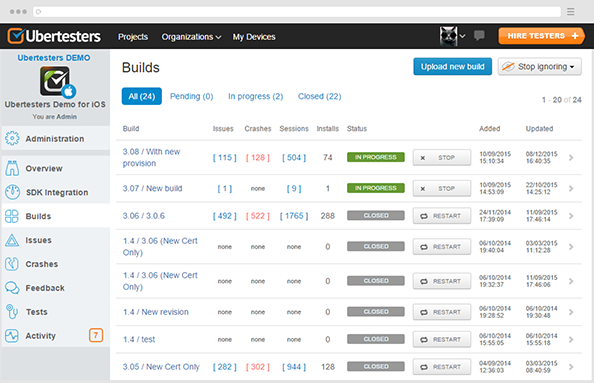
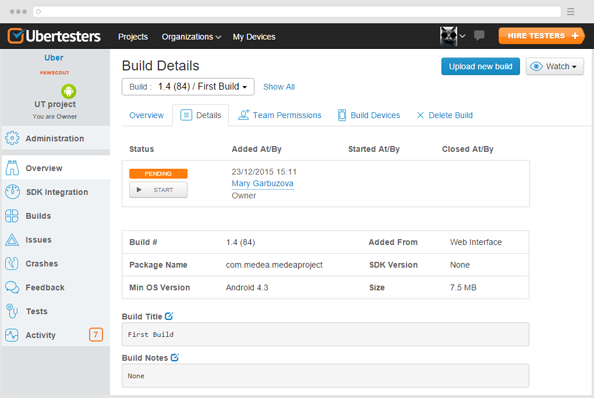
2. Start a build
Once the build is confirmed, it will be shown as Pending. Start the build to make it active.
- Access the ‘Builds’ section of the project settings;
- Click on build with ‘Pending’ status;
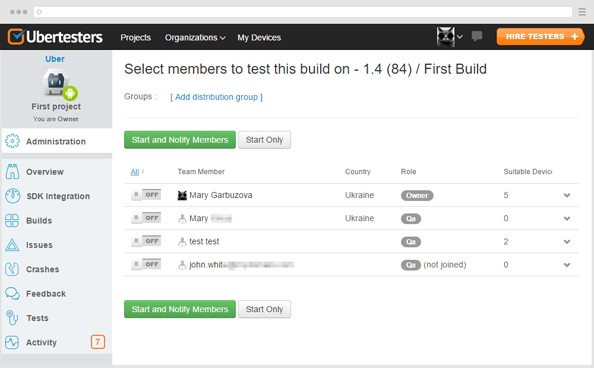
- Click on ‘Start’ next to the build button, and you will be redirected to ‘TeamPermission’ page;
- Turn the permissions to ‘On’ for the members who you want to have access to the build and then click ‘Start and notify Members’ or ‘Start Only’.
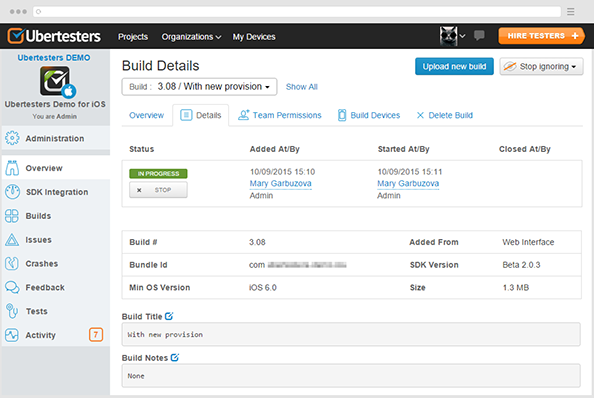
3. Closing a build
When the build is outdated or you have released a new one, it is possible to close it. To close the build:
- Navigate to the ‘Build’ section of the project menu;
- Click on the build you would like to stop and click on ‘Stop’ on the ‘Details’ screen.
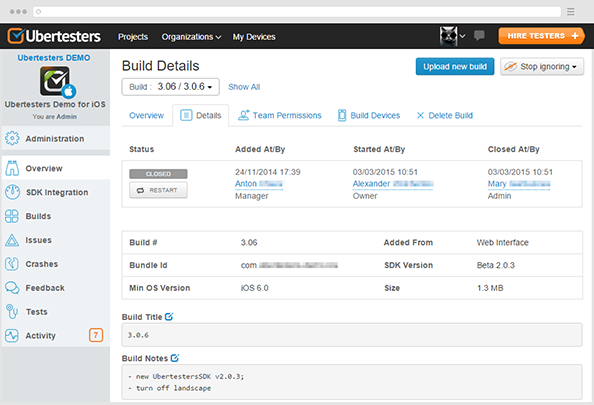
The closed builds are kept in your account as ‘Closed’. You can easily re-start the build in the following way:
- Navigate to the ‘Builds’ section of the project menu;
- Click on ‘Restart’ next to the selected build.
4. Provide/Restrict access to a build
The permissions to access the build are granted when the build is started, but can be edited any time you like. You can give access to the new members and revoke it from others.
To grant access, please do the following:
- Navigate to the Builds section of the project menu.
- Click on Selected Build.
- Select the ‘Team Permissions’ tab. To turn on the permissions for the members, switch the bar to the ‘On’ position.
- Turn the bar into the ‘Off’ position if you would like to restrict the access to the build for some members.
- Click on the ‘Update and notify members’ or ‘Update permissions’ to save changes.
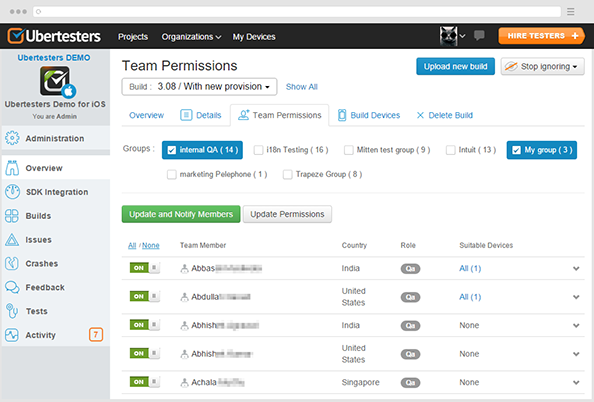
In the first case the members who were granted an access to the build will get an email notification that the new build is available for testing.
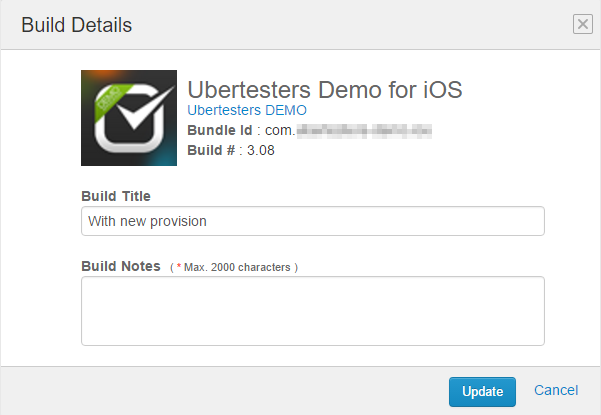
5. Edit a build title and notes
It is possible to modify the build title and notes even when the build is uploaded to Ubertesters. For this purpose, please do the following:
- Navigate to the ‘Build’ section of the project menu.
- Click on the selected build;
- Click on a pencil next to the build title or notes. The following window will appear:
- Write the necessary text and click on ‘Update’.
6. Delete a build
When the build is outdated and closed, you can delete it from the account to get the free space for new builds.
- Click on your project, access the ‘Builds’ tab.
- Select the required build and click on it.
- Navigate to the ‘Delete build’ tab.
- Click on ‘Delete this build’ (please note that this is a permanent action).
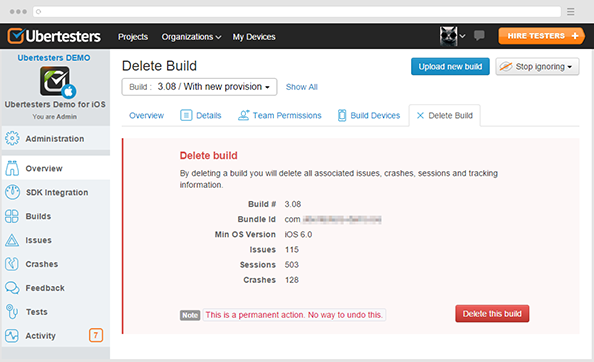
Note: this option is available for managers only.
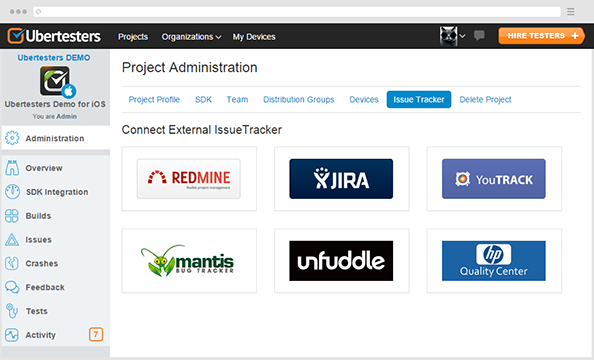
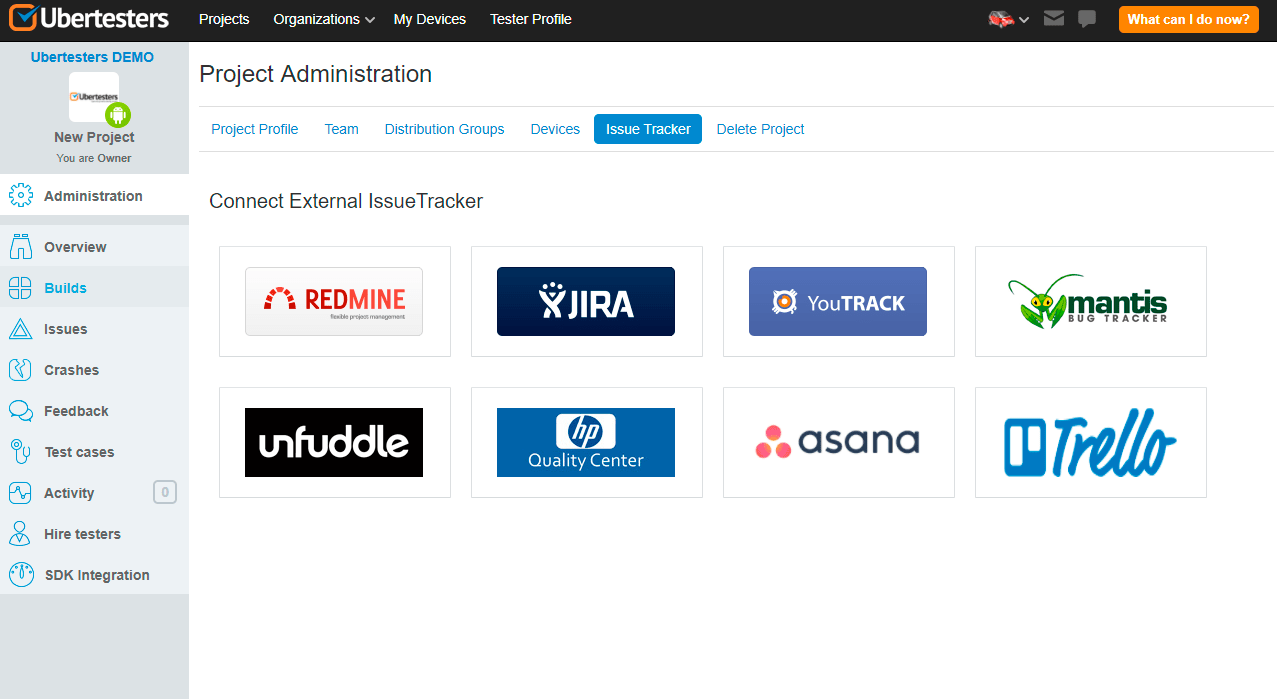
Integration with external bug trackers
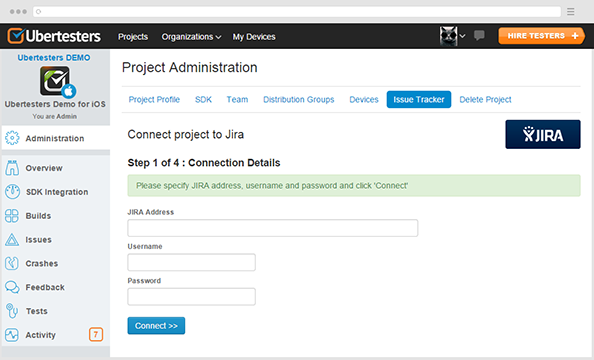
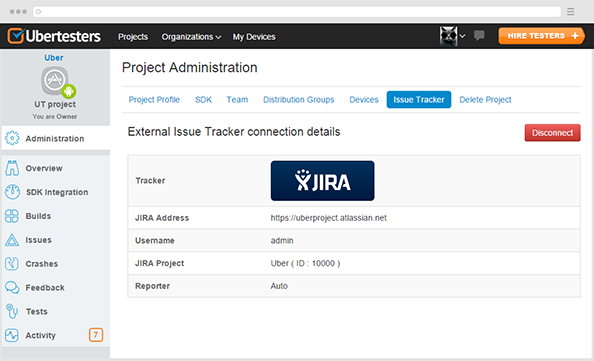
1. Integration with Jira
Ubertesters allows you to connect third-party bug tracker to your account and push the reported issues there. If you are using Jira to manage bugs and issues, you can integrate it with Ubertesters system in the following way:
- Click on the required Project and navigate to Administration section.
- Click on ‘Issue Tracker’ tab to get the list of the bug trackers.
- Select Jira from the list and click on it.
- Fill in your Jira address, username and password and click on ‘Connect’ (Please make sure your Jira address is written in the following format: http://example.yourdomain.com).
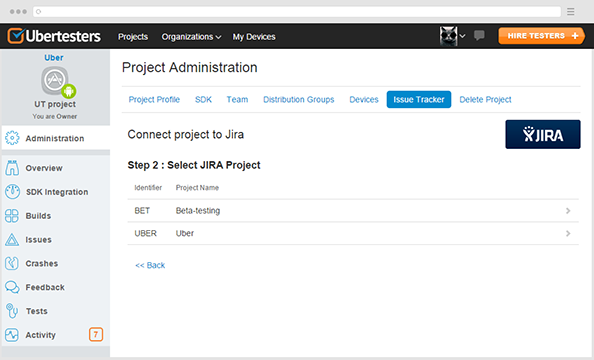
- Select Jira project you would like to connect to and click on it.
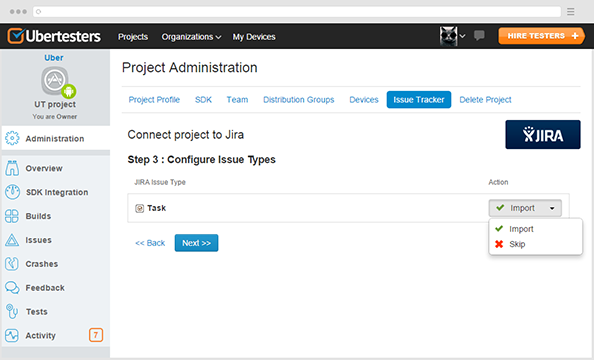
- Configure issue types.
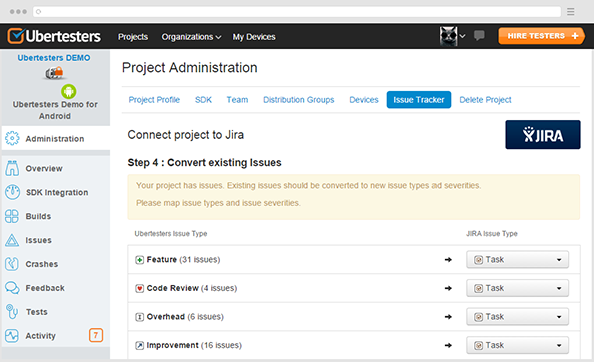
- Map the existing issues with Jira issues.
- Confirm the connection details.
The screen with Jira details will appear and you’ll be able to push the bugs from the ‘Issues’ section.

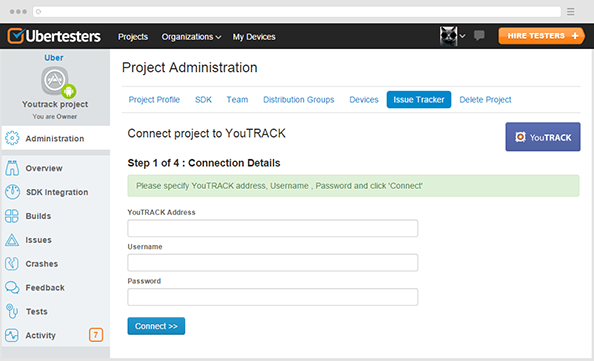
2. Integration with YouTrack
Ubertesters allows you to connect a third-party bug tracker to your account and push the reported issues there. If you are using Youtrack to manage bugs and issues, you can integrate it with Ubertesters system in the following way:
- Click on the required Project and navigate to Administration section.
- Click on ‘Issue Tracker’ tab to get the list of the bug trackers.
- Select YouTrack from the list and click on it.
- Fill in your YouTrack address, username and password and click on ‘Connect’.
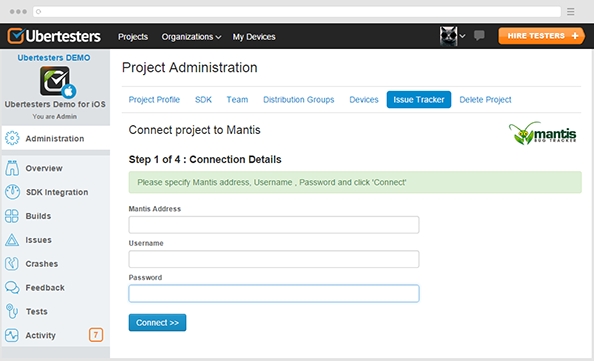
3. Integration with Mantis
Ubertesters allows you to connect a third-party bug tracker to your account and push the reported issues there. If you are using Mantis to manage bugs and issues, you can integrate it with Ubertesters system in the following way:
- Click on the required Project and navigate to Administration section.
- Click on the ‘Issue Tracker’ tab to get the list of the bug trackers.
- Select Mantis from the list and click on it.
- Fill in your Mantis address, username and password, and then click on ‘Connect’.
4. Integration with Redmine
Ubertesters allows you to connect third-party bug tracker to your account and push the reported issues there. If you are using Redmine to manage bugs and issues, you can integrate it with Ubertesters system in the following way:
To integrate Redmine with Ubertesters, please do the following:
- Click on the required Project and navigate to the ‘Administration’ section.
- Click on ‘Issue Tracker’ tab to get the list of the bug trackers;
- Select Redmine from the list and click on it;
- Fill in your Redmine address and API access key and then click ‘Connect’.
- Please check how to enable API key here.

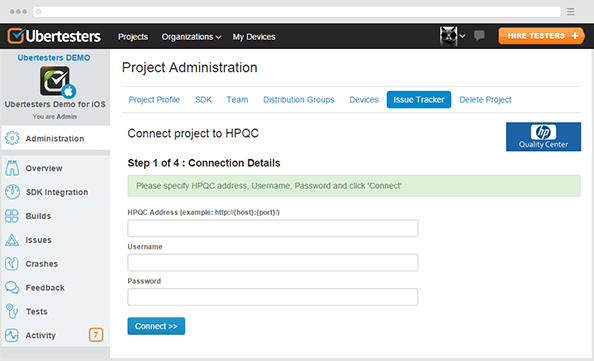
5. Integration with HP Quality Center
Ubertesters allows you to connect a third-party bug tracker to your account and push the reported issues there. If you are using HP Quality Center to manage bugs and issues, you can integrate it with Ubertesters system in the following way:
- Click on the required Project and navigate to the ‘Administration’ section;
- Click on the ‘Issue Tracker’ tab to get the list of the bug trackers;
- Select HP Quality Center from the list and click on it;
- Fill in your HP Quality Center address, username and password and then click ‘Connect’.
6. Integration with Unfuddle
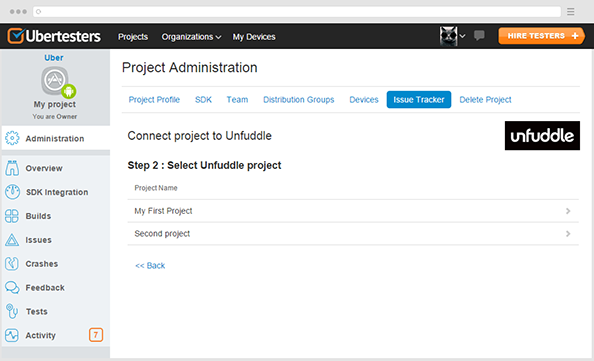
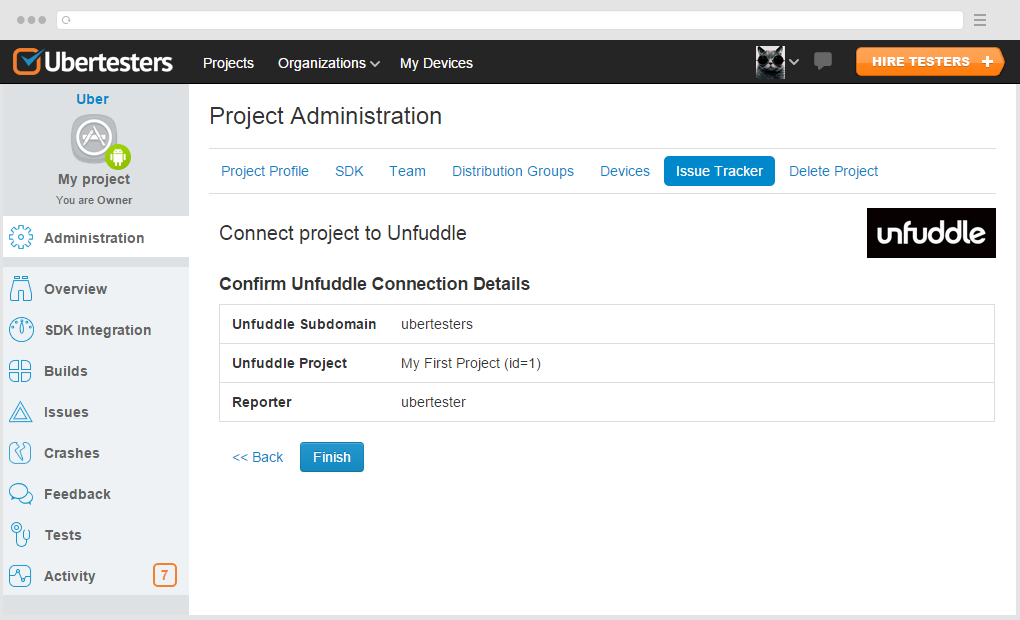
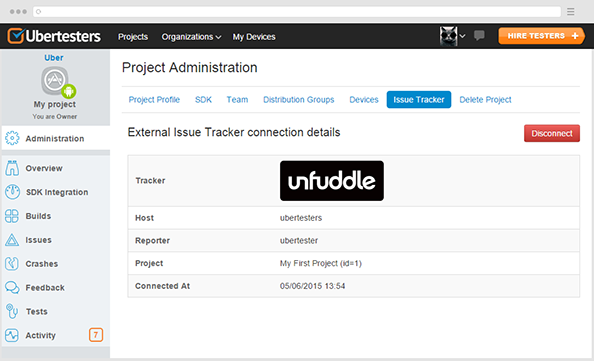
Ubertesters allows you to connect a third-party bug tracker to your account and push the reported issues there. If you are using Unfuddle to manage bugs and issues, you can integrate it with Ubertesters system in the following way:
- Click on the required Project and navigate to Administration section;
- Click on ‘Issue Tracker’ tab to get the list of the bug trackers;
- Select Unfuddle from the list and click on it;
- Specify your Unfuddle subdomain, username and password and click ‘Connect’.
- Select the project from the list and click on it.
- Configure Issue Severities if they are specified in your Unfuddle project and click on ‘Next’.
- Check the project details and click on ‘Finish’ to confirm the connection details.

When the Unfuddle is connected, the following page will be displayed.
7. Integration with Asana
To integrate your project with Anasa, please do the following:
- Click on the required ‘Project’ and navigate to Administration section.
- Click on ‘Issue Tracker’ tab to get the list of the bug trackers.
- Select ‘Asana’ from the list and click on it.
- Fill in your Asana address (Please make sure your Asana address is written in the following format: ).
- Fill in Asana ‘Personal Access Token’.
How to generate token in Asana
To generate Personal Access Token in Asana account, please do the following:
- Click on your profile icon at the top right corner > Profile settings.
- Select ‘Apps’ there > Manage Developer Apps.
- Click on ‘Create New Personal Access Token’. Write the token name and click on ‘Create’, the newly generated token will appear.
Make sure you’ve copied the token to secure place as you won’t see it again.
- Click on ‘Connect’.
- Select Asana project you would like to connect to and click on it.
- Confirm the connection details by clicking on ‘Finish’.
- The screen with Asana details will appear and you’ll be able to push the bugs from the ‘Issues’ section
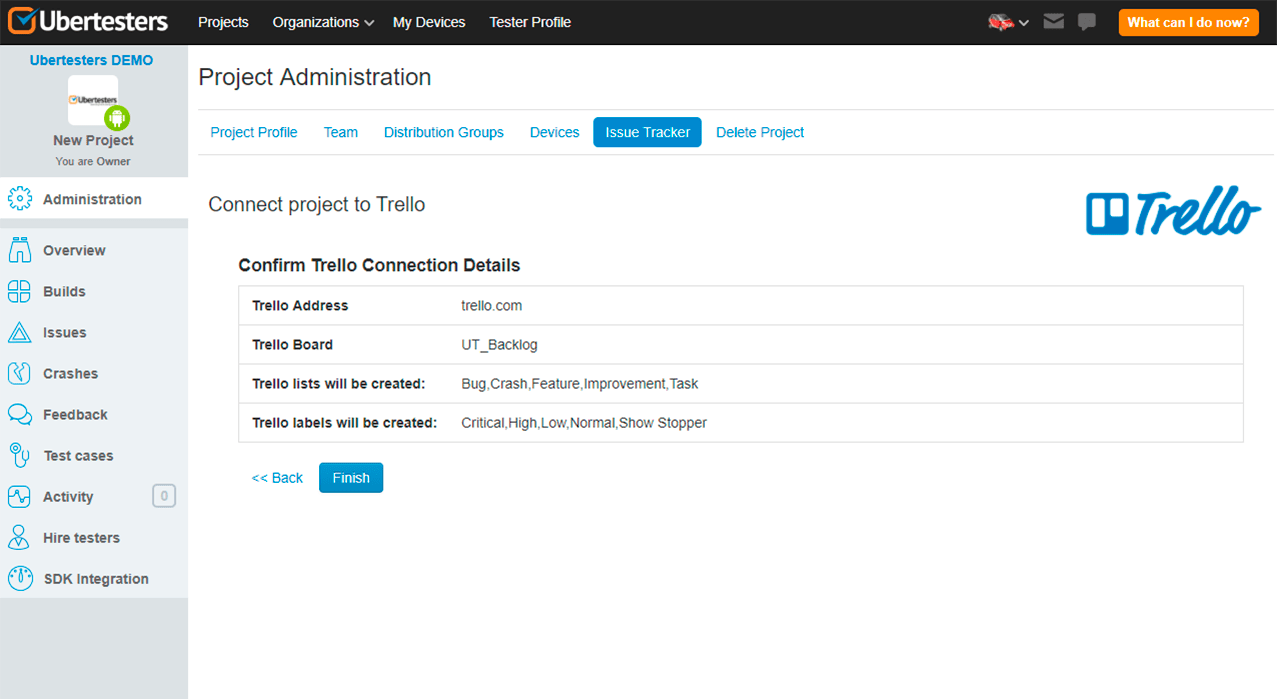
8. Trello integration
To integrate your Trello account you’ll need to do the following steps:
- Click on ‘Connect’.
- Click on your project in Ubertesters web account.
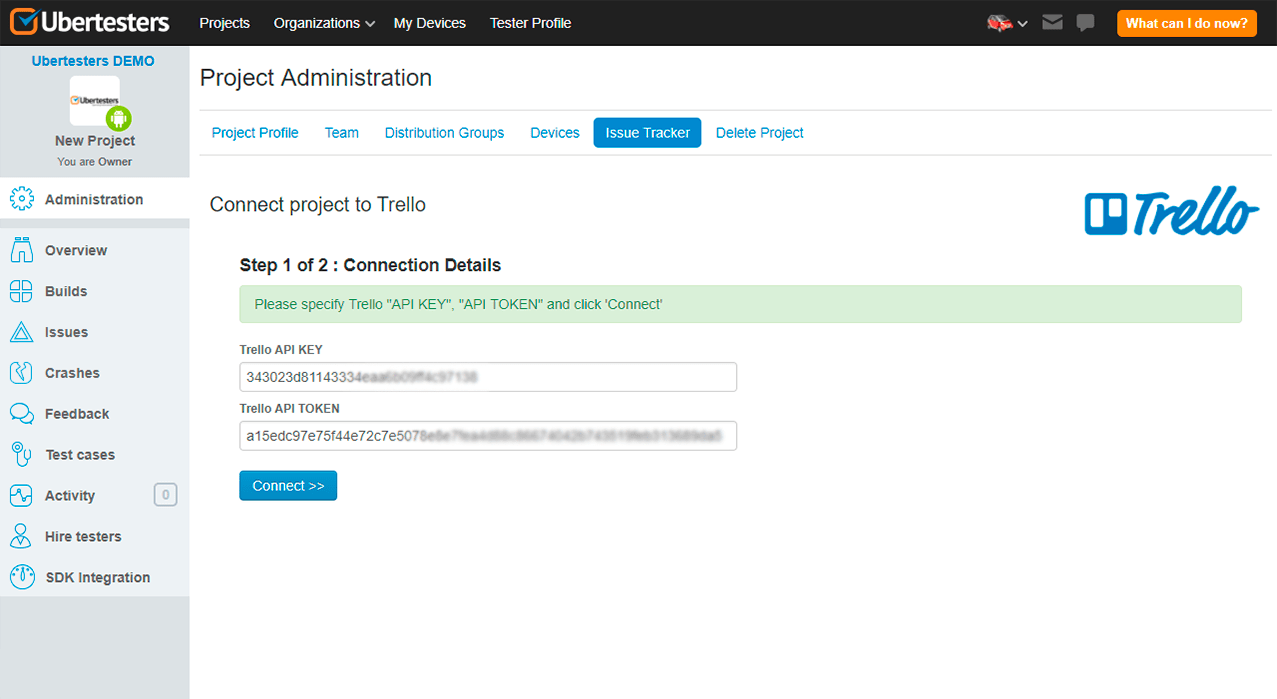
- Navigate to Administration tab and click on ‘Issue Tracker.’
- Select ‘Trello’ from the list of bug trackers.
- Enter your Trello key and generated API token and click Connect.
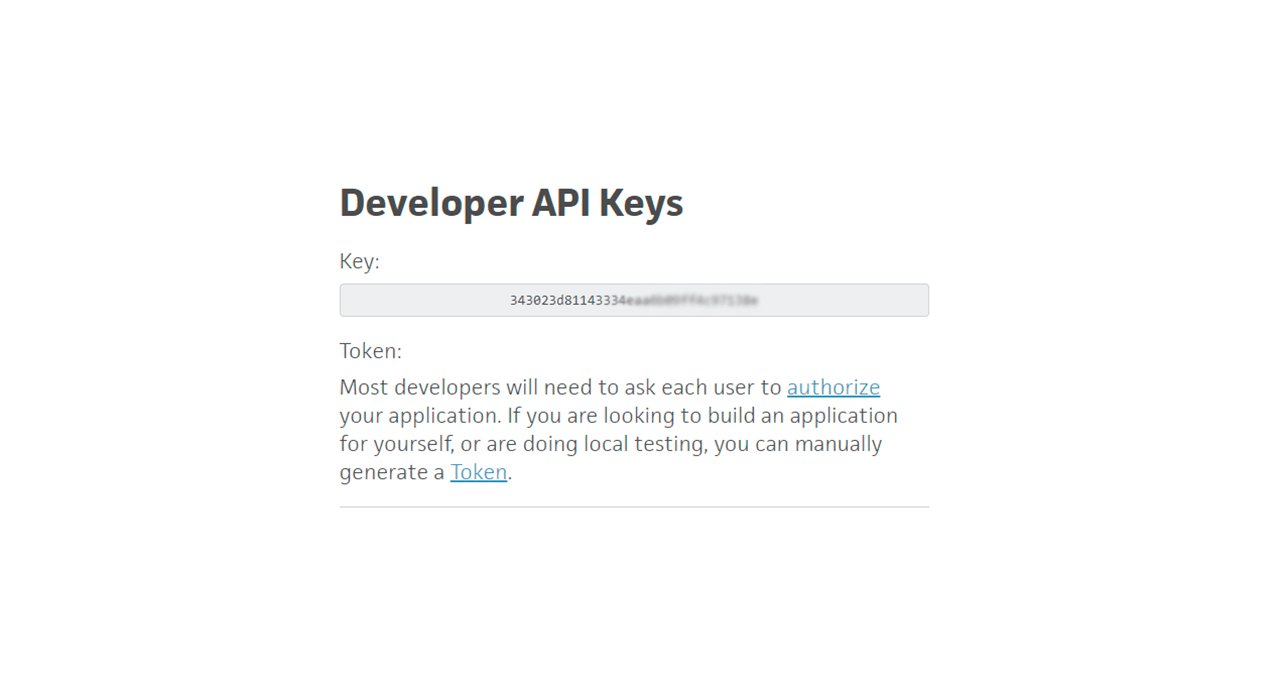
How to get Trello key and API token
To get Trello key and API token please do the following:
- Log into your Trello account.
- Open the link https://trello.com/app-key in your browser.
- Copy the key that you see under Developer API Keys section.
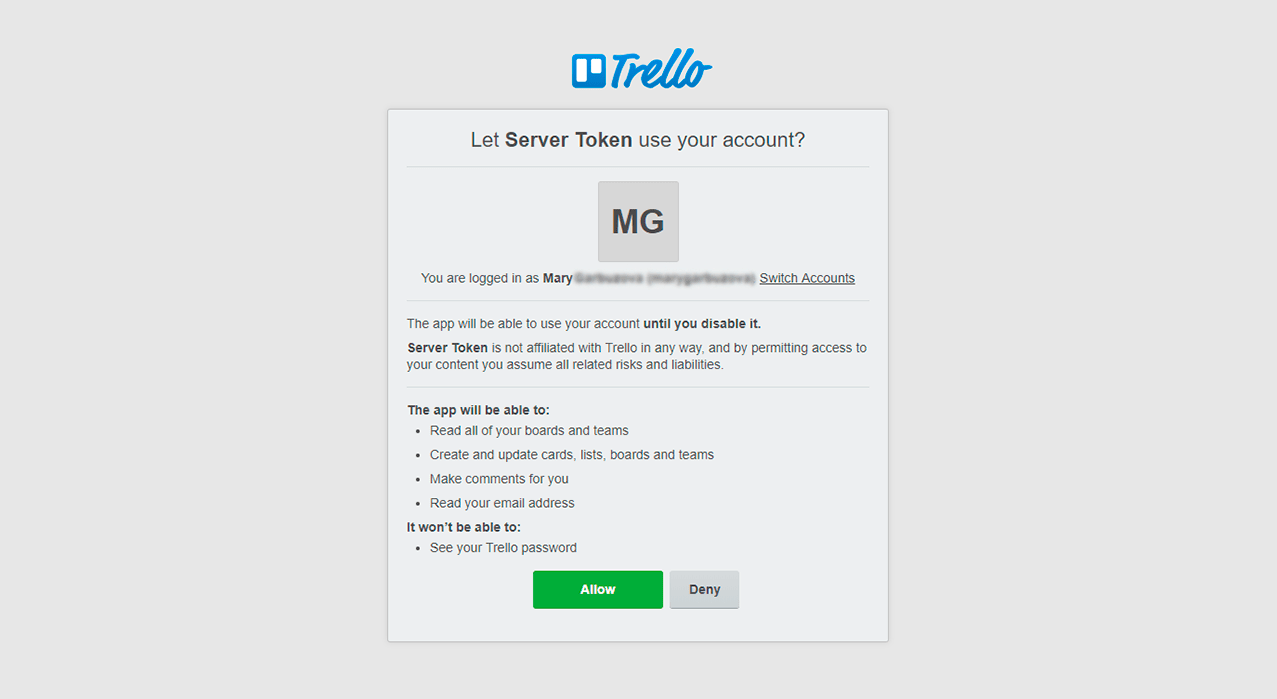
- Click on hyperlink ‘Token’ to manually generate it.
- One the page opened in the next window you’ll be ask to allow the usage of server token. Click ‘Allow’ to proceed.
The screen with Asana details will appear and you’ll be able to push the bugs from the ‘Issues’ section.
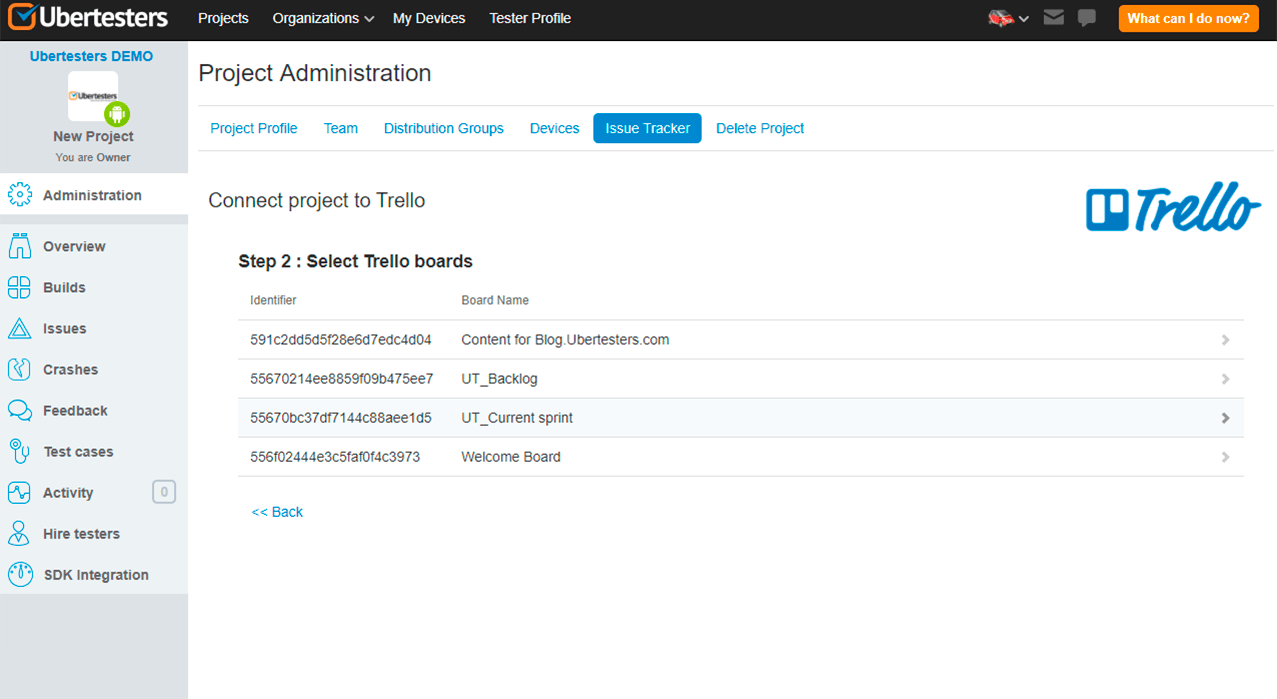
- Select a Trello board you would like to connect and click on it.
- Confirm the connection details by clicking ‘Finish’.
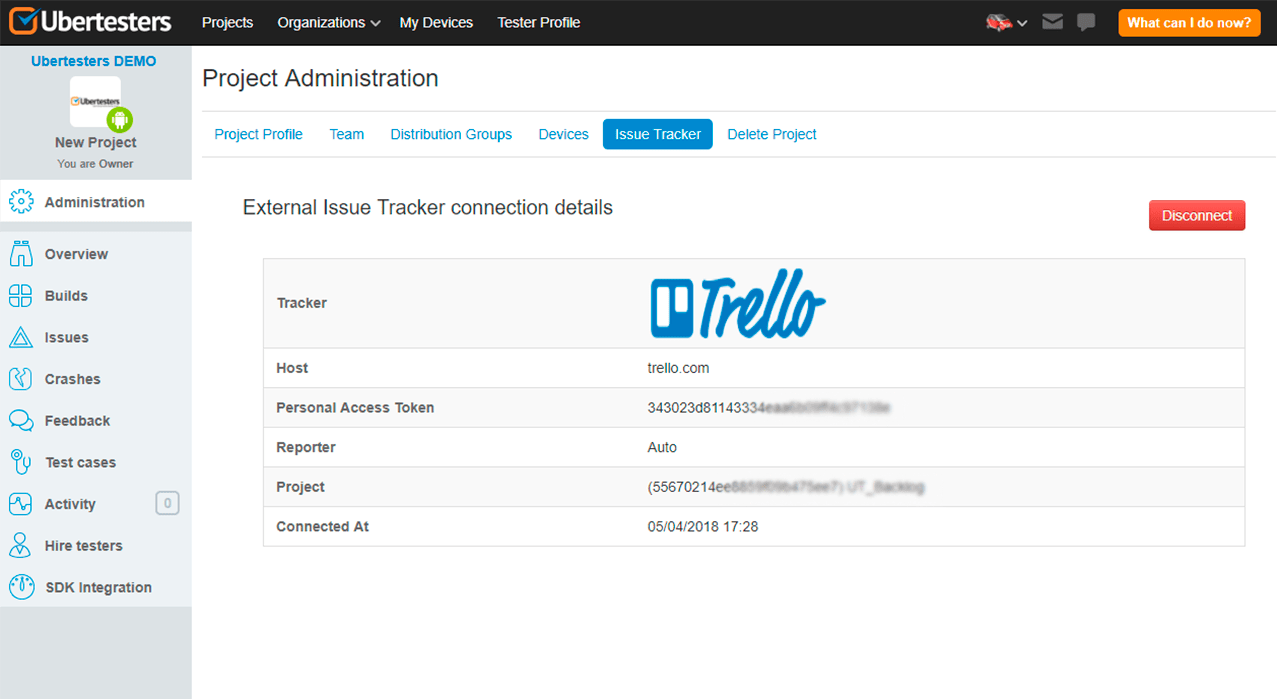
- The screen with Trello board details will appear and you’ll be able to push the bugs from the ‘Issues’ section.
9. How to Push Issues to External Bug Tracker
Once you’ve connected your bug tracker to Ubertesters, you can push the issues reported by the testers to it. The issues can be pushed in the following way:
- In the connected project, go to ‘Issues’ page.
- Tack in the issues you would like to push and click on ‘Export’ button, ‘Push to …’.
- In the appeared window ’Push issues to …’ click ‘Ok’.Once the issues are pushed, you’ll see the reference link next to their Ubertesters ID.
Built-in bug tracker
Ubertesters bug tracker allows you to do the following:
- create issues;
- edit reported issues;
- comment on the issues;
- assign the issue to a particular member;
- change the issue’s priority, severity and status;
- review the reports statistics;
- notify the users about changes in the issues;
- use advanced filters.
Read more about it in the ‘Bug submission and management’ section.
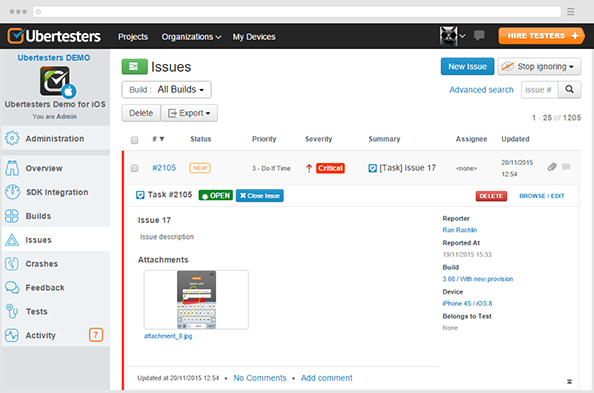
1. Create an issue from the Ubertesters web interface
Ubertesters allows to create the issues directly from the web-interface. The following fields are available:
- Summary;
- Description;
- Issue Type;
- Severity;
- Priority;
- Status;
- Assignee;
- Comment.
To create the issue, please proceed with the following steps:
- Select your Project, navigate to the ‘Issues’ tab.
- Click on ‘New issue’ button.
- Select the build and the device and fill in all the necessary fields.
- Click on ‘Save’ to complete the process. The new issue will be created.
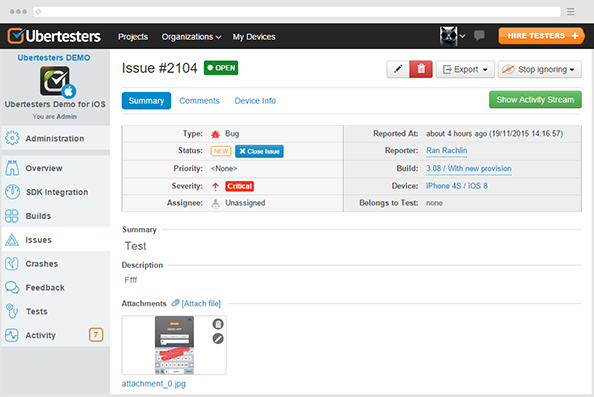
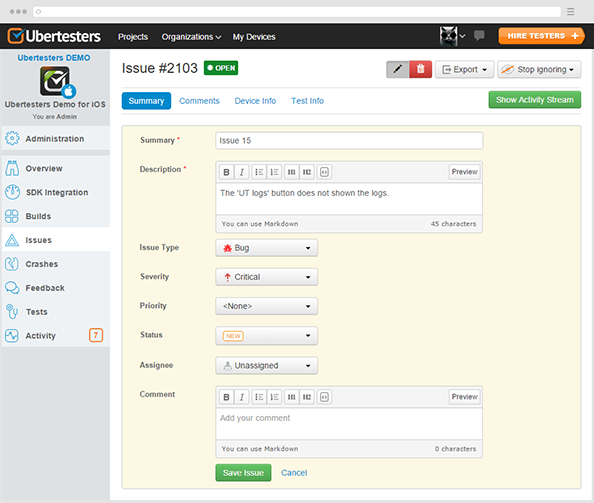
2. How to edit a reported issue
You can edit the reported issues depending on your needs. For this purpose, please do the following steps:
- Click on your Project, navigate to the ‘Issues’ section of the project menu. Select the required category and click on it. For example, ‘All issues’.
- You will be redirected to the list of issues. Click on the issue you would like to edit.
- Click on the pencil icon to start editing.
- Edit the required field (summary and description) or select the issue type/severity/priority from the dropdown menu.
- Click on ‘Save Issue’ when all the necessary additions are done.
3. How to comment on an issue
If you would like to add the additional info or leave some notes to the developers, you can comment on the issue.For this purpose, please do the following:
- Сlick on the selected issue, ‘Add a comment’.
- Type your comment and click on ‘Comment’ to save it.

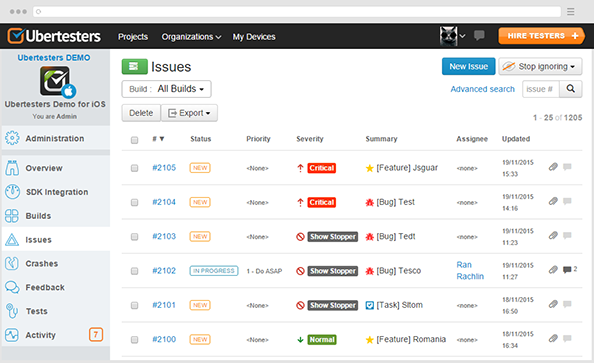
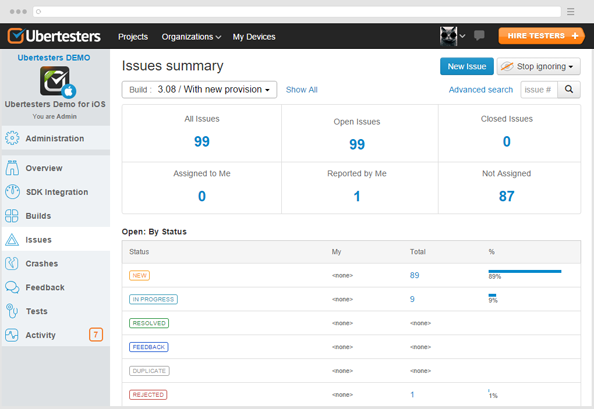
4. Review the report statistics
When clicking on the ‘Issues’ tab in your Project menu, you will get the full statistics of the reported issues. We have made the selections: by severity, by status, and by issue type. There is also information about the number of all reported issues, opened&closed issues, issues reported by you and assigned to you, not assigned, etc.
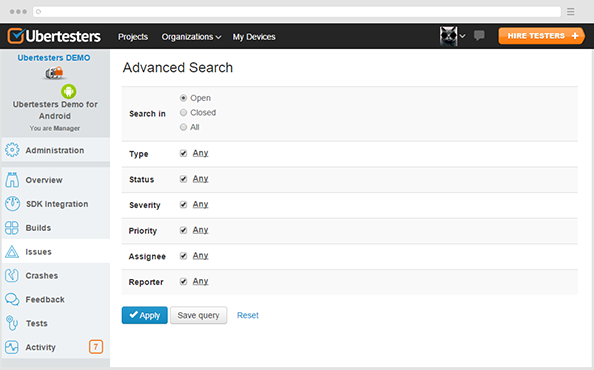
5. Advanced search
If you would like to check the issues with the particular status, type, reporter etc, you can use Advanced search. When you are on the ‘Issues’ page, please click on the ‘Advanced search’ option.
You will be redirected to the screen where you can select the parameters you need and click on ‘Apply’ to see the results. If you would like to use a search query for multiple times, you can save it by clicking ‘Save query’. Click on ‘Reset’ if you would like to change the search parameters.
FAQ
I was able to upload a single build. Everytime I try to upload a new build it fails saying: "Error : Build "testapp - 1.0 (1)" already exists! " Why can't I upload anything else?
The reason for the error message you get is because every time there is a new build uploaded, you must change the build number.
Otherwise it recognizes the build as one that already exists.
Please change the new build number.
Is there any size restriction for the builds that I want to upload to Ubertesters?
Yes, the build size restriction is 1 G.
When pushing the bug through to JIRA, it always puts me as the reporter of the bug. I’m guessing that is because my account was used to connect to JIRA. Is there another way to add more JIRA accounts to change the reporter?
When issues are pushed to JIRA, the system looks up the emails of the members in JIRA and Ubertesters with aim of connecting the appropriate ones. So if you have a reporter registered in Ubertesters with the same email that he registered in JIRA, it should set him as a reporter. If such an email was not found, our system uses the default email and reporter – the one that was used to connect JIRA.
What is notification status? In what case will I be notified
With Ubertesters you can track all the reported issues with the help of notification system. The email notifications can be configured in a convenient for users way.
There are three notification statuses
Watching – the user with such a status gets the email notification each time somebody reported an issue or edited it in Ubertesters account. The admins and managers get this status by default
Non-watching – the user will gets the email notifications about the updates in the issues he’s involved in. (the issues he created, edited or commented on).
Ignoring – the user is not getting the email notifications about the updates in any issues of the project. The notification status is set on the project level. You can set different statuses for different projects.
What lists of devices can be found in the ‘Build devices’ tab?
Build devices
These devices belong to team members who have been granted access to install this build.
Project devices
The list shows all devices that belong to team members that haven’t been granted the permissions for testing this build. Set the permissions to ‘On’ if you would like them to install the build.
Known devices
This list shows provisioned devices that belong to Ubertesters members who are not in the project team. You can add these members to the project team and grant them permission for testing this build.
Unknown devices
This list shows provisioned devices UDIDs that aren’t connected with any Ubertesters member. Please ask the member to register in Ubertesters system.